Why do we need to configure host route?
- If you want all your network traffic to pass through specific IP
- If you have a firewall on the network and you want use it as a default gateway
- If you want to use a default gateway different that neutron vrouter interface IP.
These sections walk you through configuring host routes on Openstack using Openstack API client and Openstack horizon
Using openstack API client
After you create a network, copy its network ID. You use this ID to create a subnet and boot the server.
Issue the following openstack client command, substituting your own values for the ones shown.
1. Create network with openstack API request
openstack network create mynet1
The output will look something like this:
+---------------------------+--------------------------------------+
| Field                     | Value                                |
+---------------------------+--------------------------------------+
| admin_state_up            | UP                                   |
| availability_zone_hints   | None                                 |
| availability_zones        | None                                 |
| created_at                | None                                 |
| description               |                                      |
| dns_domain                | None                                 |
| id                        | bdc60b40-bf41-4436-9693-1a70c812e8e5 |
| ipv4_address_scope        | None                                 |
| ipv6_address_scope        | None                                 |
| is_default                | None                                 |
| is_vlan_transparent       | None                                 |
| mtu                       | None                                 |
| name                      | mynet1                               |
| port_security_enabled     | True                                 |
| project_id                | 6ad04a695b1c4faa841d10e0e0227aa2     |
| provider:network_type     | None                                 |
| provider:physical_network | None                                 |
| provider:segmentation_id  | None                                 |
| qos_policy_id             | None                                 |
| revision_number           | None                                 |
| router:external           | Internal                             |
| segments                  | None                                 |
| shared                    | False                                |
| status                    | ACTIVE                               |
| subnets                   |                                      |
| tags                      |                                      |
| updated_at                | None                                 |
+---------------------------+--------------------------------------+
Copy the id value from the output. You will use this value when you create a subnet, provision your server, or perform other related activities.
2. Creating a subnet with host routes (neutron client)
To create a subnet with host routes, you specify a network, an IP address, allocation pools, and host routes for your subnet.
Issue the following openstack API command, substituting your own values for the ones shown.
openstack subnet create \
  --network bdc60b40-bf41-4436-9693-1a70c812e8e5 \
  --ip-version 4 --subnet-range 172.18.8.0/24 \
  --host-route destination=0.0.0.0/0,gateway=172.18.8.254 \
    mysubnet1
positional arguments:
  <name>                New subnet name, we used the name `mysubnet1`

optional arguments:
  --subnet-range <subnet-range>
                        Subnet range in CIDR notation (required if --subnet-
                        pool is not specified, optional otherwise), we used the range `172.18.8.0/24`
  --gateway <gateway>   Specify a gateway for the subnet. The three options
                        are: <ip-address>: Specific IP address to use as the
                        gateway, 'auto': Gateway address should automatically
                        be chosen from within the subnet itself, 'none': This
                        subnet will not use a gateway, e.g.: --gateway
                        172.18.8.1, --gateway auto, --gateway none (default
                        is 'auto'). we left it to the `default`
  --ip-version {4,6}    IP version (default is 4). Note that when subnet pool
                        is specified, IP version is determined from the subnet
                        pool and this option is ignored. We used `--ip-version 4`
  --network <network>   Network this subnet belongs to (name or ID). we used the network ID `8520c323-c7ee-4313-918a-cb1549b6e40c`
  --allocation-pool start=<ip-address>,end=<ip-address>
                        Allocation pool IP addresses for this subnet e.g.:
                        start=192.168.199.2,end=192.168.199.254 (repeat option
                        to add multiple IP addresses). We didn't configure allocation pool
  --dns-nameserver <dns-nameserver>
                        DNS server for this subnet (repeat option to set
                        multiple DNS servers). we didn't configure dns-nameserver
  --host-route destination=<subnet>,gateway=<ip-address>
                        Additional route for this subnet we used.:
                        `destination=0.0.0.0/0,gateway=172.18.8.254`
                        destination: destination subnet (in CIDR notation)
                        gateway: nexthop IP address (repeat option to add
                        multiple routes)
The output will look something like this:
+----------------------+-------------------------------------------------+
| Field                | Value                                           |
+----------------------+-------------------------------------------------+
| allocation_pools     | 172.18.8.2-172.18.8.254                         |
| cidr                 | 172.18.8.0/24                                   |
| created_at           | 2022-11-08T07:26:19.955631                      |
| description          | None                                            |
| dns_nameservers      |                                                 |
| dns_publish_fixed_ip | None                                            |
| enable_dhcp          | True                                            |
| gateway_ip           | 172.18.8.1                                      |
| host_routes          | destination='0.0.0.0/0', gateway='172.18.8.254' |
| id                   | 74b5c426-d45f-42d5-9e75-1a5f73d426b6            |
| ip_version           | 4                                               |
| ipv6_address_mode    | None                                            |
| ipv6_ra_mode         | None                                            |
| name                 | mysubnet1                                       |
| network_id           | bdc60b40-bf41-4436-9693-1a70c812e8e5            |
| project_id           | 6ad04a695b1c4faa841d10e0e0227aa2                |
| revision_number      | None                                            |
| segment_id           | None                                            |
| service_types        | None                                            |
| subnetpool_id        | None                                            |
| tags                 |                                                 |
| updated_at           | 2022-11-08T07:26:19.955631                      |
+----------------------+-------------------------------------------------+
Using Openstack Horizon dashboard
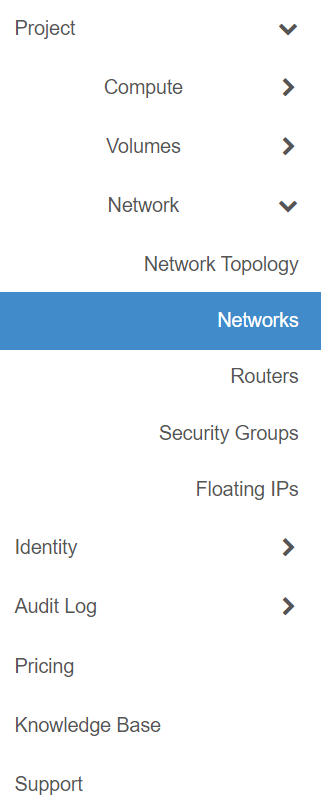
Navigate to Project > Network > Network, and follow the wizard instruction as per screenshot:
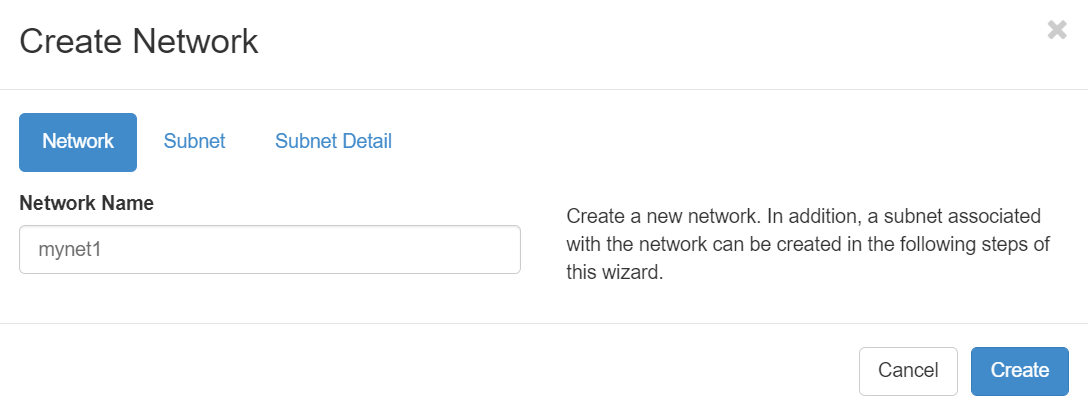
Click on Create Network
1. Type Network name
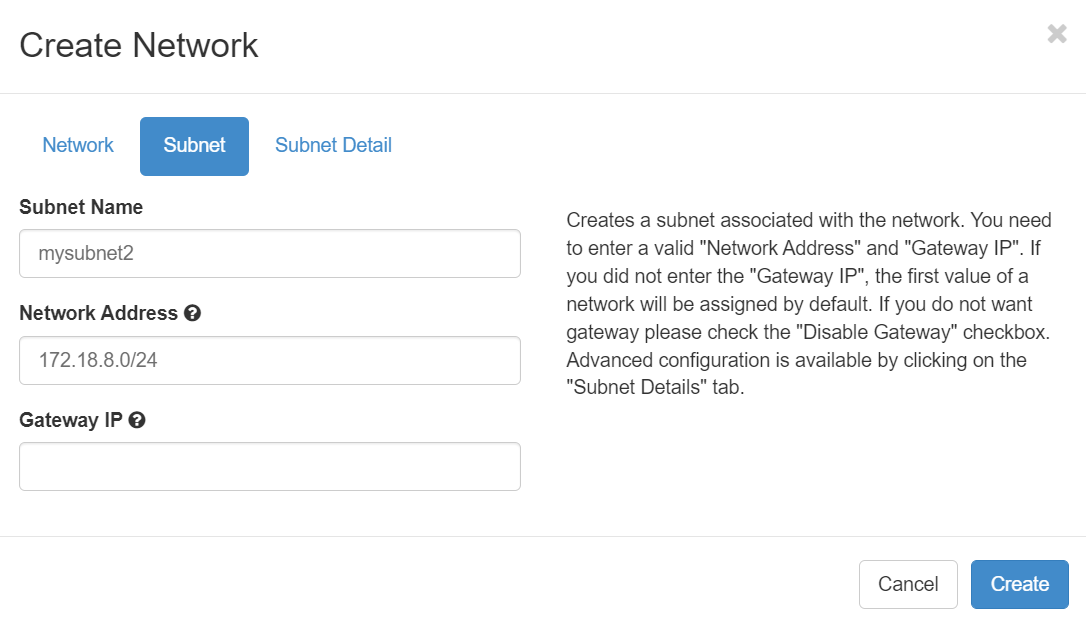
2. Complete subnet information
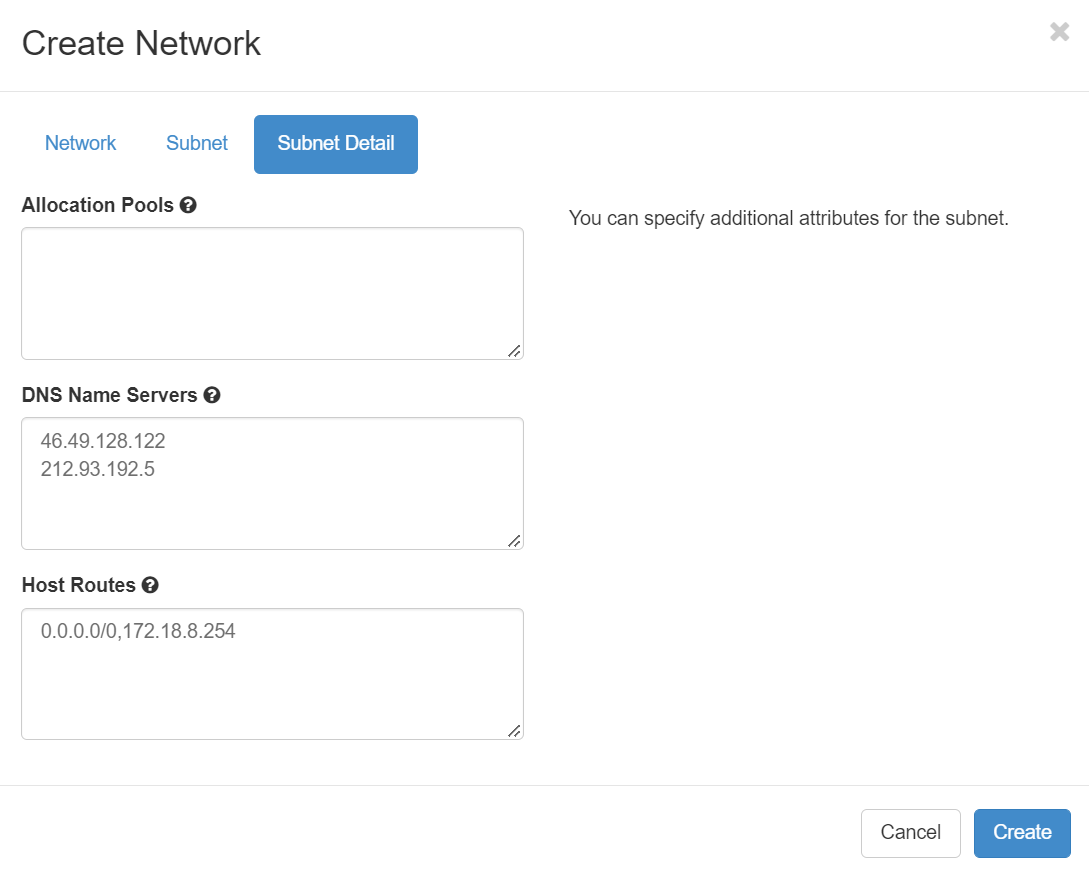
3. Complete subnet details.
In this section, add your host route information. below is the syntax:
<destination_cidr>,<next_hop>
e.g 0.0.0.0/24,10.10.10.1
and one entry per line
And finally click on Create.


